

Editing call flows is for admins and supervisors. On the Numbers page, the Callflow shortcut is admin-only.
Open a call flow
You can open a number’s call flow in two ways:- In the sidebar, select Calls → Call Flow, then pick a number from the list.
- Go to Calls → Numbers, open a number’s actions menu, and select Callflow.
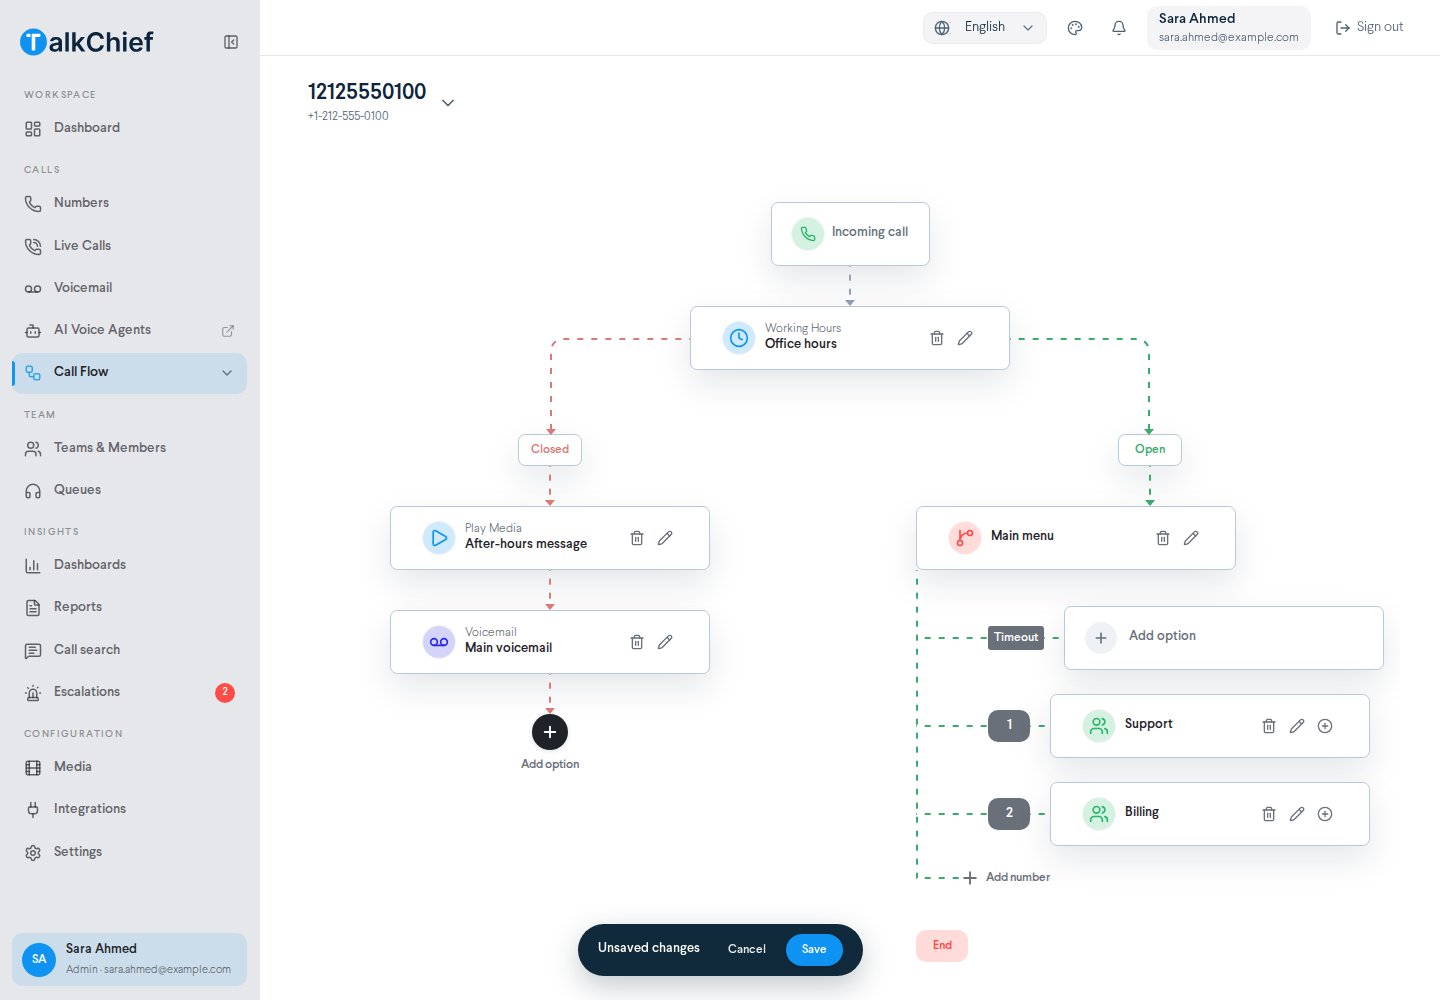
Steps you can add
Select Add option under any step to add the next one. These steps are available:
The first step after Incoming call can also be a time condition:
Some older flows may show a Webhook step. It sends call data to a web address. You can edit an existing Webhook step, but you can’t add a new one from the menu.
Build a call flow
1
Add the first step
Under Incoming call, select Add option and pick a step. For a business that closes at night, start with Time Condition.
2
Configure the step
A settings panel opens. Fill in the fields and select Save. To change a step later, select its Edit button. To remove it, select Delete.
3
Add what happens next
Select Add sub-step on a step to add the next one. For time conditions, add steps under both Open and Closed.
4
Save the flow
Your edits show an Unsaved changes bar at the bottom of the screen. Select Save to apply them, or Cancel to throw them away.
Build an IVR menu
An IVR plays a recorded menu, such as “Press 1 for sales”, and sends callers to a step based on the key they press.1
Add the IVR step
Select Add option and pick IVR. The IVR settings panel opens.
2
Name it and pick the prompt
Enter a Name and choose the Media file that plays the menu. Upload the file in Configuration → Media first if you don’t have one yet.
3
Set the options
Under Settings, choose:
- Allow caller to dial extensions to let callers type a member’s extension.
- Misdial retries for how many wrong entries a caller gets.
- Timeout for dialing and Enter digit timeout, in seconds.
4
Add a row for each key
Select Add number to add a row, pick the key (0–9), and choose the step it leads to. The Timeout row handles callers who don’t press anything. You can also add an Invalid row for wrong keys.
Route callers to an AI agent
The AI Agent step rings an AI voice agent the same way a member is rung. Pick the agent under Select AI agent and set Keep ringing for. If you have no AI agents yet, the panel links to agents.talkchief.io so you can create one first. For a full walkthrough, see Add an AI agent to a call flow.Frequently asked questions
Why can't I add a step after a Queue?
Why can't I add a step after a Queue?
Queue and Callflow end a branch. To handle callers who wait too long, set the queue’s failover. See Queues and routing.
Where do the working hours in a Time Condition come from?
Where do the working hours in a Time Condition come from?
From each team’s Working Hours on the team Settings tab. See Working hours and media.
The editor says the call flow could not be loaded
The editor says the call flow could not be loaded
Select Retry. If it keeps failing, check that the number is still active in Calls → Numbers.
Related pages
Call routing
See how teams, queues, and forwarding work together.
Working hours and media
Set opening hours and upload menu prompts.
Voicemail
Review the messages callers leave.
Add an AI agent to a call flow
Let an AI voice agent answer your calls.