> ## Documentation Index
> Fetch the complete documentation index at: https://docs.talkchief.io/llms.txt
> Use this file to discover all available pages before exploring further.
# AI voice agent tools and integrations | TalkChief
> Connect TalkChief AI voice agents to Business APIs, MCP connectors, and workspace email, set caller confirmation, and manage the 25 voice action limit.
Tools let an agent look up information and take actions during a call. You define each tool once on a workspace page. Then you enable it for the inbound agents and campaigns that need it.
| Tool type | Where you set it up | Example |
| - | - | - |
| **Business APIs** | **Tools & APIs** | Look up an order status in your system |
| **MCP connectors** | **Tools & APIs** | Use tools from a hosted MCP server, such as a calendar or CRM |
| **Email** | **Email** | Send a confirmation email to the caller |
| **Call controls** | The agent's **Skills & tools** | End the call, send keypad tones, record do-not-call requests |
Agents can only use tools you enable for them. Connection secrets are stored encrypted and are never shown to the agent or the caller.
## Add a Business API
A Business API is an HTTPS endpoint in your own system. The editor has four steps: **Basics**, **Connection**, **What the agent sends**, and **Test**.
In the sidebar, click **Tools & APIs**, choose **Business APIs**, and click **Add Business API**.
Enter a **Display name**, for example "Check order status". Under **What does this API do?**, choose **Looks up information** or **Makes a change**. In **When should the agent use it?**, describe the caller request that should trigger it. Under **More details**, you can add what the agent must establish first.
Choose the **Request type** (GET, POST, PUT, PATCH, or DELETE) and enter the **HTTPS endpoint**. Under **Sign-in**, choose **None**, **Bearer token**, or **API key**, and enter the credential.
Click **Add a field** for each detail the agent collects from the caller. Set the **Field name**, **What it is**, an **Example value**, and whether it is **Required**. To ask the caller before each request, turn on **Ask the caller to confirm first**.
Enter test values and click **Send test request**. The result shows **Passed**, **Failed**, or **Unknown result**, with the HTTP status and a response preview.
Click **Add Business API**.
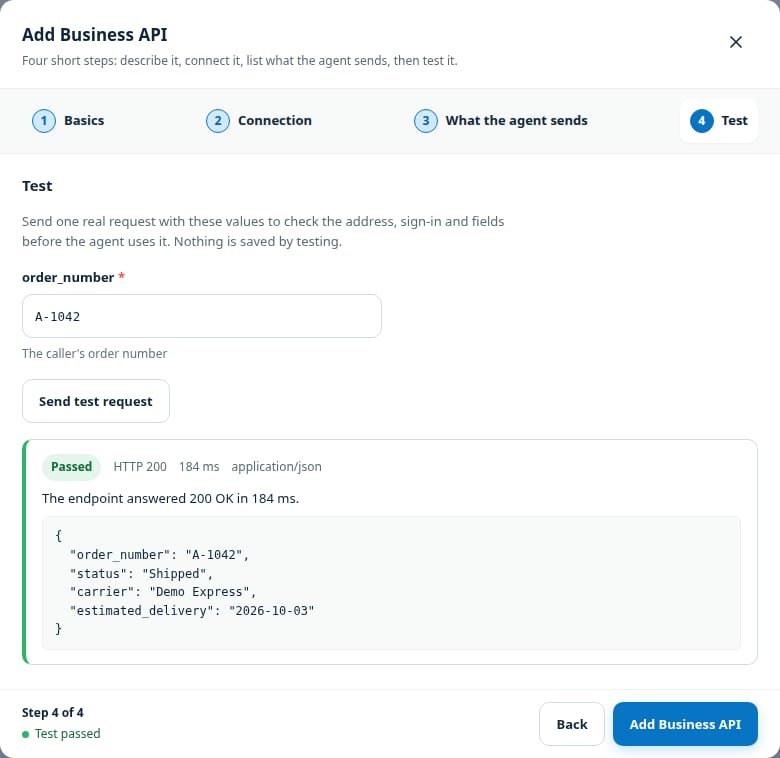 For an API that **Makes a change**, the test sends a real request. Use test data your system recognizes.
## Add an MCP connector
MCP connectors bring in tools from a hosted MCP server over HTTPS. Use them to reach services such as calendars, CRMs, or automation platforms.
In **Tools & APIs**, choose **MCP connectors** and click **Add connector**.
Enter a **Name** and the **HTTPS URL**. Under **Authentication**, choose **None**, **Bearer token**, or **API key header**, and enter the **Token or API key**.
Click **Connect and discover**. TalkChief lists every tool the server offers.
Click **Edit definition** on a tool. Write **When to use this tool**, set **Execution behavior** to a lookup or an action, and choose the caller confirmation. Click **Save definition**.
Every discovered tool is on by default. Turn off any tool agents must never use. A tool marked **Needs classification on Tools & APIs** cannot be enabled until you set its **Execution behavior**.
TalkChief supports hosted HTTPS servers using Streamable HTTP or legacy SSE. Local servers are not supported.
## Connect workspace email
Each workspace has one email sender.
In the sidebar, click **Email**, then **Add email connection**. Enter the **Display name**, **Mail server**, **Port**, **Connection security**, **Username**, **From email**, and **App password**.
Under **Agent usage guidance**, fill in **When may an assigned agent use this?**.
Save the connection. Under **Verify sending**, enter an address you control and click **Send test email**.
Agents can only use email after a test email succeeds.
## Choose caller confirmation
Every Business API, MCP tool, and email connection has a **Caller confirmation** setting.
| Option | What the agent does |
| - | - |
| **Run without asking** | Uses the tool as soon as it has the required details |
| **Confirm first** | Reads back the details and waits for the caller to confirm |
Business APIs default to **Run without asking**.
Choose **Confirm first** for tools that change data or send email, such as booking, canceling, or updating a record.
## Enable tools for an agent
Open the agent and go to **Skills & tools**. The section has these tabs: **MCP tools**, **Business APIs & email**, **Transfers**, and **Call controls**.
* **MCP tools**: turn on the switch for each tool the agent may use.
* **Business APIs & email**: click **Assign to agent**. Under **Optional agent-specific guidance**, you can narrow when this agent uses it.
* **Call controls**: turn on **Allow the agent to end the call**, **Allow keypad tones**, or **Record do-not-call requests**.
Tool assignments save immediately. **Spoken progress updates** and call controls need **Save changes**.
For an API that **Makes a change**, the test sends a real request. Use test data your system recognizes.
## Add an MCP connector
MCP connectors bring in tools from a hosted MCP server over HTTPS. Use them to reach services such as calendars, CRMs, or automation platforms.
In **Tools & APIs**, choose **MCP connectors** and click **Add connector**.
Enter a **Name** and the **HTTPS URL**. Under **Authentication**, choose **None**, **Bearer token**, or **API key header**, and enter the **Token or API key**.
Click **Connect and discover**. TalkChief lists every tool the server offers.
Click **Edit definition** on a tool. Write **When to use this tool**, set **Execution behavior** to a lookup or an action, and choose the caller confirmation. Click **Save definition**.
Every discovered tool is on by default. Turn off any tool agents must never use. A tool marked **Needs classification on Tools & APIs** cannot be enabled until you set its **Execution behavior**.
TalkChief supports hosted HTTPS servers using Streamable HTTP or legacy SSE. Local servers are not supported.
## Connect workspace email
Each workspace has one email sender.
In the sidebar, click **Email**, then **Add email connection**. Enter the **Display name**, **Mail server**, **Port**, **Connection security**, **Username**, **From email**, and **App password**.
Under **Agent usage guidance**, fill in **When may an assigned agent use this?**.
Save the connection. Under **Verify sending**, enter an address you control and click **Send test email**.
Agents can only use email after a test email succeeds.
## Choose caller confirmation
Every Business API, MCP tool, and email connection has a **Caller confirmation** setting.
| Option | What the agent does |
| - | - |
| **Run without asking** | Uses the tool as soon as it has the required details |
| **Confirm first** | Reads back the details and waits for the caller to confirm |
Business APIs default to **Run without asking**.
Choose **Confirm first** for tools that change data or send email, such as booking, canceling, or updating a record.
## Enable tools for an agent
Open the agent and go to **Skills & tools**. The section has these tabs: **MCP tools**, **Business APIs & email**, **Transfers**, and **Call controls**.
* **MCP tools**: turn on the switch for each tool the agent may use.
* **Business APIs & email**: click **Assign to agent**. Under **Optional agent-specific guidance**, you can narrow when this agent uses it.
* **Call controls**: turn on **Allow the agent to end the call**, **Allow keypad tones**, or **Record do-not-call requests**.
Tool assignments save immediately. **Spoken progress updates** and call controls need **Save changes**.
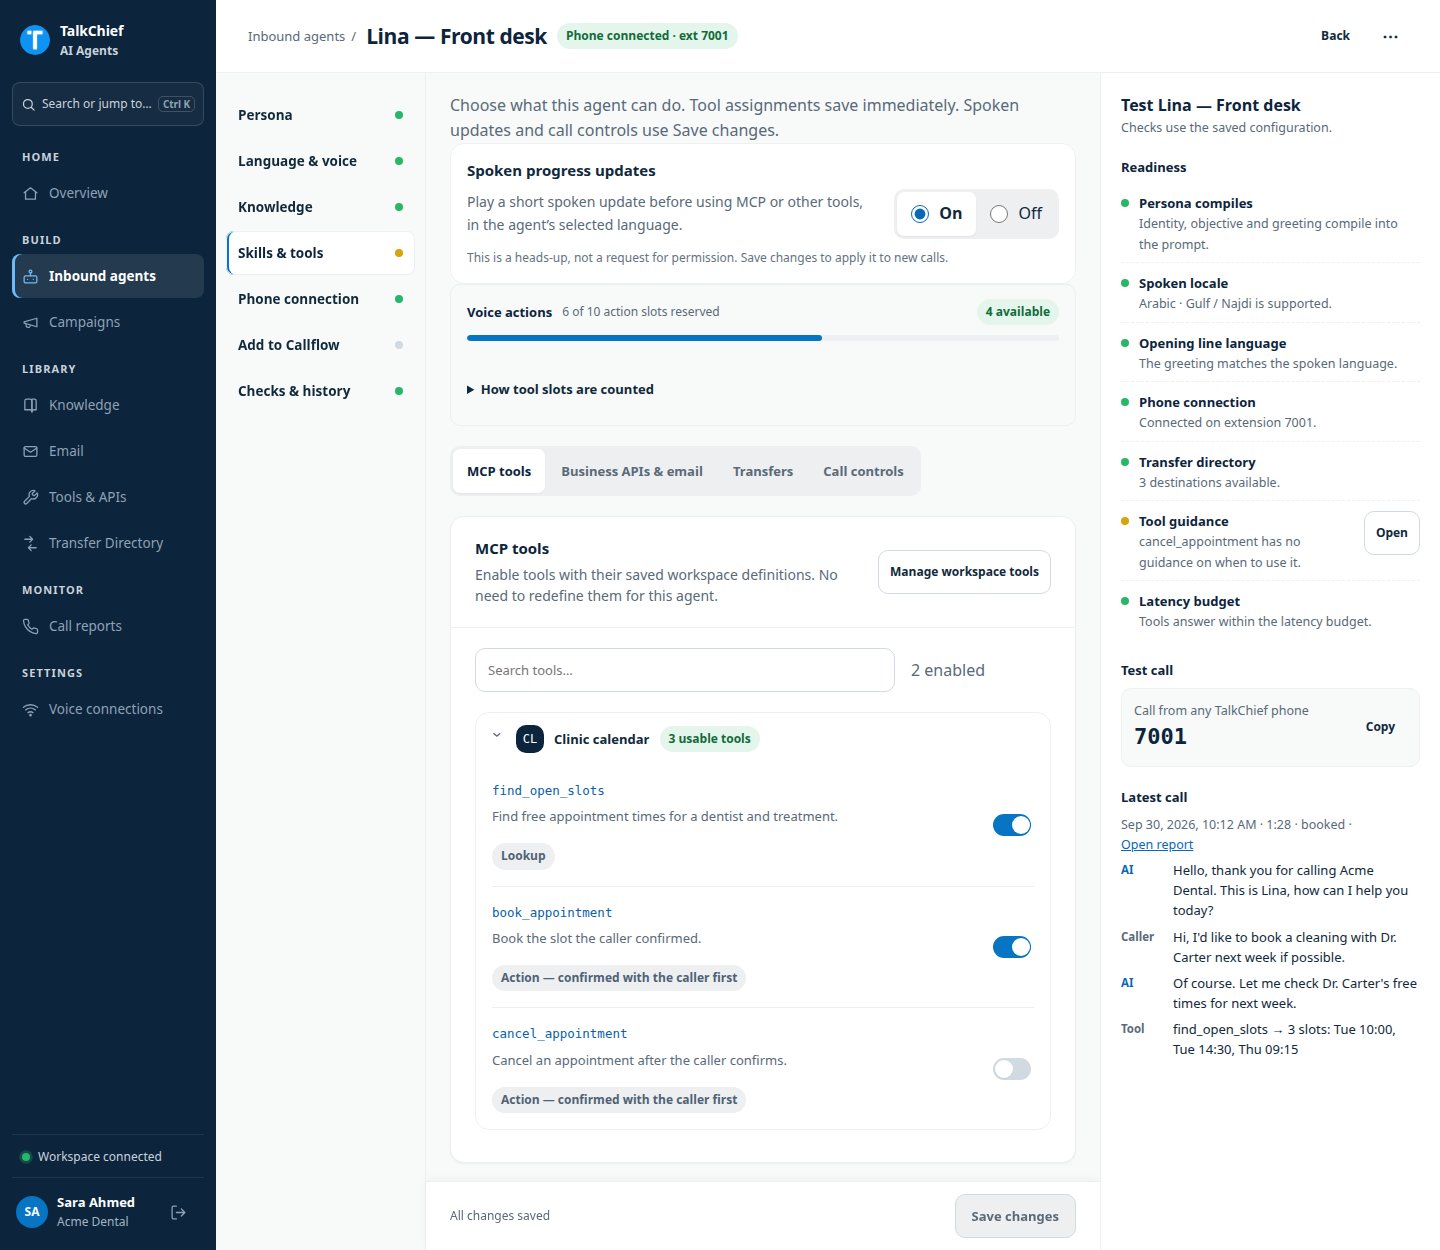 ### Spoken progress updates
Turn on **Spoken progress updates** to have the agent say a short line, such as "Just a moment", before it runs a tool. It needs a primary language, so it is unavailable with **Auto-detect**.
For campaigns, you add tools in the campaign's **Knowledge & actions** section. See [Outbound campaigns](/ai-agents/outbound-campaigns).
## Voice actions limit
Each agent and each campaign can use up to **25 voice actions**. The **Voice actions** meter shows how many slots are in use.
* Transfers reserve one slot. All transfer destinations share it.
* Email reserves one slot. All email connections share it.
* Knowledge search uses one slot.
* Each Business API uses one slot.
* Each connected MCP tool uses one slot.
When the limit is reached, TalkChief rejects any change that would go over it. To free a slot, disable a tool or remove it from the agent.
## Troubleshooting
The agent already uses 25 voice actions. Open **Skills & tools**, review the **Voice actions** meter, then switch off or remove a tool you do not need. Try again.
Send a test email from the **Email** page. Agents cannot use a sender until a test email succeeds.
Check the URL and credential, then click **Refresh tools**. The connector must be reachable over public HTTPS.
Yes, through an MCP connector from a calendar or automation provider. Add it in **Tools & APIs**, then enable its tools for the agent.
## Related pages
Hand callers to the right person.
Give the agent approved documents.
This documentation is built and hosted on [Mintlify](https://mintlify.com), a developer documentation platform.
### Spoken progress updates
Turn on **Spoken progress updates** to have the agent say a short line, such as "Just a moment", before it runs a tool. It needs a primary language, so it is unavailable with **Auto-detect**.
For campaigns, you add tools in the campaign's **Knowledge & actions** section. See [Outbound campaigns](/ai-agents/outbound-campaigns).
## Voice actions limit
Each agent and each campaign can use up to **25 voice actions**. The **Voice actions** meter shows how many slots are in use.
* Transfers reserve one slot. All transfer destinations share it.
* Email reserves one slot. All email connections share it.
* Knowledge search uses one slot.
* Each Business API uses one slot.
* Each connected MCP tool uses one slot.
When the limit is reached, TalkChief rejects any change that would go over it. To free a slot, disable a tool or remove it from the agent.
## Troubleshooting
The agent already uses 25 voice actions. Open **Skills & tools**, review the **Voice actions** meter, then switch off or remove a tool you do not need. Try again.
Send a test email from the **Email** page. Agents cannot use a sender until a test email succeeds.
Check the URL and credential, then click **Refresh tools**. The connector must be reachable over public HTTPS.
Yes, through an MCP connector from a calendar or automation provider. Add it in **Tools & APIs**, then enable its tools for the agent.
## Related pages
Hand callers to the right person.
Give the agent approved documents.
This documentation is built and hosted on [Mintlify](https://mintlify.com), a developer documentation platform.