> ## Documentation Index
> Fetch the complete documentation index at: https://docs.talkchief.io/llms.txt
> Use this file to discover all available pages before exploring further.
# Route inbound calls to an AI voice agent | TalkChief
> Send calls on your TalkChief numbers to an inbound AI voice agent with the call flow AI Agent step, then verify the agent with checks and a test call.
An inbound agent only answers calls that a call flow sends to it. This page shows how to connect the agent, add it to a number's call flow, and test it before real callers reach it.
Each inbound agent uses one slot of your plan's AI agent limit. The **Inbound agents** page shows your usage. To raise the limit, contact TalkChief support.
## Before you start
* Finish the agent's **Persona** and **Language & voice**. See [Create an agent](/ai-agents/create-an-agent).
* Make sure your TalkChief wallet holds at least \$10.
## Step 1: Check the phone connection
TalkChief creates a dedicated phone line for each inbound agent when you create it.
Open the agent and go to **Phone connection**.
The **TalkChief AI agent line** card shows the agent's extension and status. The page header shows **Phone connected** with the extension.
If the card says **Connection needs attention**, click **Retry connection**.
The line stays connected on its own. Closing the browser does not stop the agent.
## Step 2: Add the agent to a call flow
Do this once for each number that should ring the agent.
In the TalkChief web app, go to **Numbers**. Find the number and click **Callflow**.
Click **Add option** where the call should go, then choose **AI Agent**.
In **Select AI agent**, search for and select your agent. Set **Keep ringing for** between 15 and 60 seconds, then click **Save**.
Click **Save** to apply the call flow.
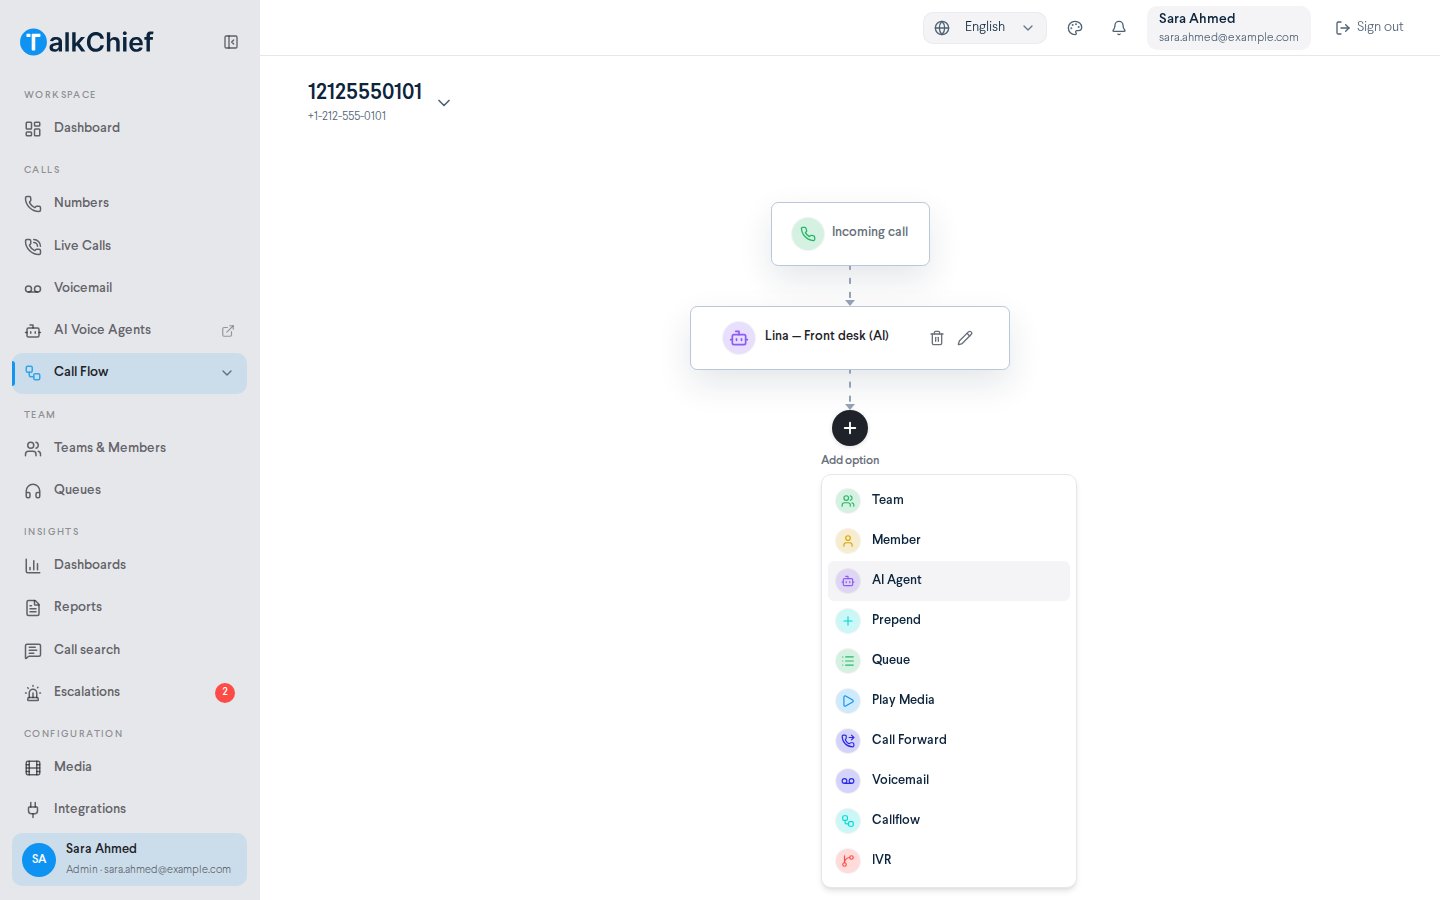 You can combine the agent with other steps. For example, send calls to the agent outside working hours, or from one option of a phone menu. See [Call flows](/phone/call-flows).
The agent's **Add to Callflow** section repeats these steps and has an **Open app.talkchief.io** button. The section cannot see your call flows, so it never shows as complete.
## Step 3: Run the configuration checks
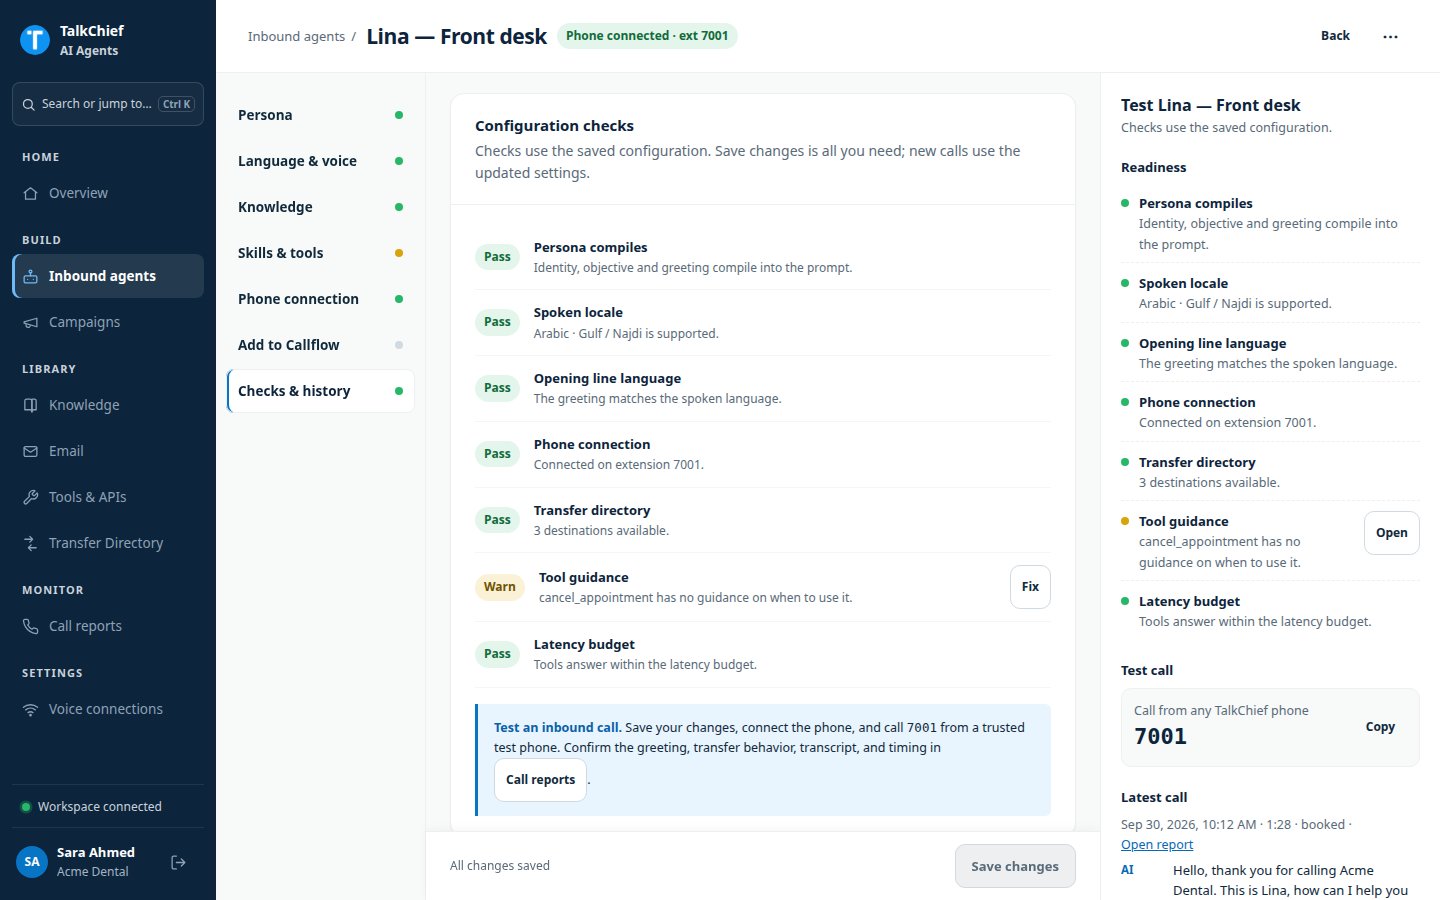
Open the agent and go to **Checks & history**. **Configuration checks** test the saved setup, such as the persona, greeting language, phone line, tools, and transfer directory.
* **Pass** means the item is ready.
* **Warn** or **Fail** shows what to fix. Click **Fix** to jump to the right section.
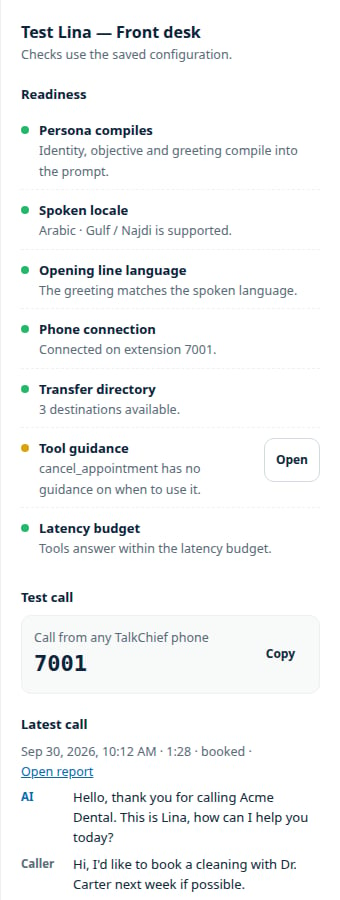
The **Test** panel on the right shows the same readiness list at any time.
You can combine the agent with other steps. For example, send calls to the agent outside working hours, or from one option of a phone menu. See [Call flows](/phone/call-flows).
The agent's **Add to Callflow** section repeats these steps and has an **Open app.talkchief.io** button. The section cannot see your call flows, so it never shows as complete.
## Step 3: Run the configuration checks
Open the agent and go to **Checks & history**. **Configuration checks** test the saved setup, such as the persona, greeting language, phone line, tools, and transfer directory.
* **Pass** means the item is ready.
* **Warn** or **Fail** shows what to fix. Click **Fix** to jump to the right section.
The **Test** panel on the right shows the same readiness list at any time.
 ## Step 4: Place a test call
Click **Save changes**. New calls use the saved settings. There is no separate publish step.
From a trusted TalkChief phone, call the extension shown under **Test call**. You can also call the number you routed in step 2.
The **Latest call** panel shows the first lines of the conversation. Click **Open report** to see the full call in **Call reports**.
Confirm the greeting, answers, transfers, and timing before you route customer traffic to the agent.
## Step 4: Place a test call
Click **Save changes**. New calls use the saved settings. There is no separate publish step.
From a trusted TalkChief phone, call the extension shown under **Test call**. You can also call the number you routed in step 2.
The **Latest call** panel shows the first lines of the conversation. Click **Open report** to see the full call in **Call reports**.
Confirm the greeting, answers, transfers, and timing before you route customer traffic to the agent.
 ## Troubleshooting
Create the agent in the agents workspace first. If the list does not load, refresh the call flow page.
Open the agent's **Phone connection** and check the line status. Click **Retry connection** if it needs attention. Also check that your wallet holds at least \$10.
Delete an agent you no longer use, or ask TalkChief support to raise the limit. Remove a deleted agent from any call flow first.
No. Build the menu in the call flow and route one of its options to the AI Agent step.
## Related pages
Build the routing for each number.
Review the test call.
This documentation is built and hosted on [Mintlify](https://mintlify.com), a developer documentation platform.
## Troubleshooting
Create the agent in the agents workspace first. If the list does not load, refresh the call flow page.
Open the agent's **Phone connection** and check the line status. Click **Retry connection** if it needs attention. Also check that your wallet holds at least \$10.
Delete an agent you no longer use, or ask TalkChief support to raise the limit. Remove a deleted agent from any call flow first.
No. Build the menu in the call flow and route one of its options to the AI Agent step.
## Related pages
Build the routing for each number.
Review the test call.
This documentation is built and hosted on [Mintlify](https://mintlify.com), a developer documentation platform.